In this guide, you will learn how to:
Create an employment
Send employment data
Advance the employment through the onboarding process
Invite the new hire
📒 Table of Contents
Before you get started, ensure that you:
You can check which countries are supported by the Remote API using the list countries endpoint:
$ curl --location \\
       --request GET \\
       --header 'Authorization: Bearer eyJraWQ...' \\
       '<https://gateway.remote-sandbox.com/eor/v1/countries>'
<aside>
ℹ️ When you’re ready to release your integration, replace the domain with https://gateway.remote.com.
</aside>
<aside> ℹ️ This will provide you with a list of countries we support, along with their country codes. You will be asked to provide the “country code” for the employment when creating the employment below.
</aside>
If your desired country is not supported, you can reach out to your Remote contact or email [email protected] to let us know of your interest to hire in your country of choice.
First, you will need to provide the employment “basic information”. The Remote API asks for this information for every supported country. As the payload might be different from country to country, you will have to look up the expected payload.
The Remote API uses JSON schemas to define the expected basic information payload. You can use the show form schema endpoint to get the employment_basic_information JSON schema for your country of choice. Looking at the API documentation, you can see that there are two parameters expected, country_code and form:
GET <https://gateway.remote-sandbox.com/v1/countries/{country_code}/{form}>
The employment in this guide is located in Canada, so you have to use Canada’s {country_code} to make this request. The {form} will be employment_basic_information.
To get the country_code of a country, make a request to the supported countries endpoint as shown above. You’ll see that the country_code for Canada is CAN.
You’re now ready to make the request:
$ curl --location \\
       --header 'Authorization: Bearer eyJraWQiO...' \\
       --request GET '<https://gateway.remote-sandbox.com/v1/countries/CAN/employment_basic_information>'
You can then use the resulting JSON Schema to know which fields are required, their labels, descriptions, and validation rules.
<aside> ⚠️ Getting used to JSON schemas can take time. And because the schemas for employment data are dynamic, we highly recommend building your UI Forms dynamically when using the Remote API in production.
Head over to the How JSON Schemas Work guide to learn more.
</aside>
Understanding provisional_start_date validations
Although JSON Schemas have validation rules for each field, the field provisional_start_date does not include all the validation rules because some are too complex to be described in a JSON schema. As such, some validations are only available through the API, when calling the create employment endpoint. The JSON Schema for this field looks similar to the following:
{
  "title": "Provisional start date",
  "format": "date",
  "x-jsf-presentation": {
    "inputType": "date",
    "meta": { "mot": 3 },
    "minDate": "2023-09-23"
    }
  }
}
Here’s an explanation for each of those validations:
The Remote API validates all the rules above per country. If you send a POST or PATCH to /employments with a date that doesn’t comply with all the rules above, the API will return an error, explaining the reason behind it.
<aside>
ℹ️ Enhancements are in progress for provisional_start_date validations. Remote plans to add all the validations described above to the JSON Schema in Q4 2023.
</aside>
Validation flow: It’s common for the Customer to take multiple days to finish the Employee Onboarding flow. You can use the meta.mot number to implement an “expiration system” that notifies your Customer if the start date is no longer valid. For example: Imagine the MOT is 2 days, today is Monday and they selected the start date for Friday. The days have passed and now it’s Thursday but the customer hasn’t finished the flow yet. The start date is no longer valid, so could automatically notify your Customer about it.
With the JSON schema describing the basic information, you can submit the data using the create employment endpoint.
Start by sending a POST request to https://gateway.remote-sandbox.com/v1/employments. The employment you create will be assigned to the company-scoped access token of the company you would like to create this employment. Here’s how you can build the request:
Authorization header with a valid company-scoped access token.Content-Type: application/json header to indicate the format of the submitted data.country_code you’re using is a supported country using the list countries endpoint.The basic information data should be sent through the basic_information object:
$ curl --location \\
     --request POST '<https://gateway.remote-sandbox.com/v1/employments>' \\
     --header 'Authorization: Bearer eyJraWQiO...' \\
     --header 'Content-Type: application/json' \\
     --data-raw '{
    "country_code": "CAN",
    **"basic_information": {
      "name": "Bob Remote",
      "job_title": "Senior Graphic Designer",
      "email": "[email protected]",
      "provisional_start_date": "2023-05-05",
      "has_seniority_date": "no"
    },**
    "type": "employee"
    }'
Being deprecated: Currently, you can also send the basic information data using the root fields, but that’s will soon be deprecated in favor of basic_information.
$ curl --location \\
     --request POST '<https://gateway.remote-sandbox.com/v1/employments>' \\
     --header 'Authorization: Bearer eyJraWQiO...' \\
     --header 'Content-Type: application/json' \\
     --data-raw '{
    "country_code": "CAN",
    "type": "employee",
    // vvv BEING DEPRECATED vvv
   **** "**full_name**": "Bob Remote",
    "**job_title**": "Senior Graphic Designer",
    "**personal_email**": "[email protected]",
    "**provisional_start_date**": "2023-05-05",
****    }'
The basic_information object also includes some dynamic fields depending on the country, such as has_seniority_date. That’s why using JSON Schemas will be crucial here, to ensure each country has its own dynamic required data.
Email tips: - For the email parameter, in the Sandbox environment, we recommend setting an email address that is unique and can receive emails, so that you can verify that the employee receives the email as you’d expect**:**
+randomtext to make it unique, but still go to the same inbox. For example, if your company email is [email protected], you could do [email protected] to make it a unique email address, but still have all emails go to your inbox. This is a useful email testing strategy.<aside>
ℹ️ If your company-scoped access token has expired, follow the Refresh Token Flow to obtain a new valid token. You will receive an Unauthorized response if it’s expired.
</aside>
The employment was created successfully. Most of the response you receive is equivalent to the data you provided, except for one: employment_lifecycle_stage. This field will be important for moving this employment through the different stages of employment. You can read more about the individual stages here. We will also make use of employment_lifecycle_stage throughout this guide.
Now that we have an employment, we can get started with its onboarding. Take note of the employment ID, 9fb23136-bb7c-488a-b5dc-37d3b7c9033b, we’re going to need it later.
Before the person you’re hiring can be invited to Remote, you will need to provide some information about this employment.
When you create an employment, its employment_lifecycle_stage is "employment_creation". We want to get to the next stage, which is employment_self_enrollment. The update employment endpoint accepts diverse employment-specific data in its request body.
You’ll need to provide the following details before the next stage to invite the employee:
contract_detailspricing_plan_detailsThe API documentation gives you details on what’s needed for these two fields. For example, the contract_details:
Contract information. As its fields vary depending on the country, you must query the Show form schema endpoint passing the country code and contract_details as path parameters.
In the same way we did above to fetch the JSON Schemas for the employment_basic_information, we’ll do the same for contract_details.
You’re now ready to make the request:
$ curl --location \\
     --request GET '<https://gateway.remote-sandbox.com/v1/countries/CAN/contract_details>' \\
     --header 'Authorization: Bearer eyJraWQiO...' \\
You’ll receive a JSON schema as a result, similar to how we did above with the basic information.
Make sure to do the same for pricing_plan_details.
With the contract_details and pricing_plan_details JSON Schemas handy, you’re ready to call the update employment endpoint to set the necessary details.
In order to update the employment, you will need to send a PATCH request to /v1/employments/{id}. Replace the {id} with the ID you got for this employment during the employment creation step (for the employment created in this guide, it was 9fb23136-bb7c-488a-b5dc-37d3b7c9033b):
Authorization header with a valid company-scoped access token.Content-Type: application/json header to indicate the format of the submitted data.Here’s an example of what details you may be setting for your employment. Keep in mind that every country has a different fields and they change over time, so yours might look different than the example here**:**
A successful update will result in a 200 OK response.
When you have sent all the required data, you are ready to invite the employee through the Invite employment endpoint.
$ curl --location \\
     --request POST '<https://gateway.remote-sandbox.com/v1/employments/9fb23136-bb7c-488a-b5dc-37d3b7c9033b/invite>' \\
     --header 'Authorization: Bearer eyJraWQiO...' \\
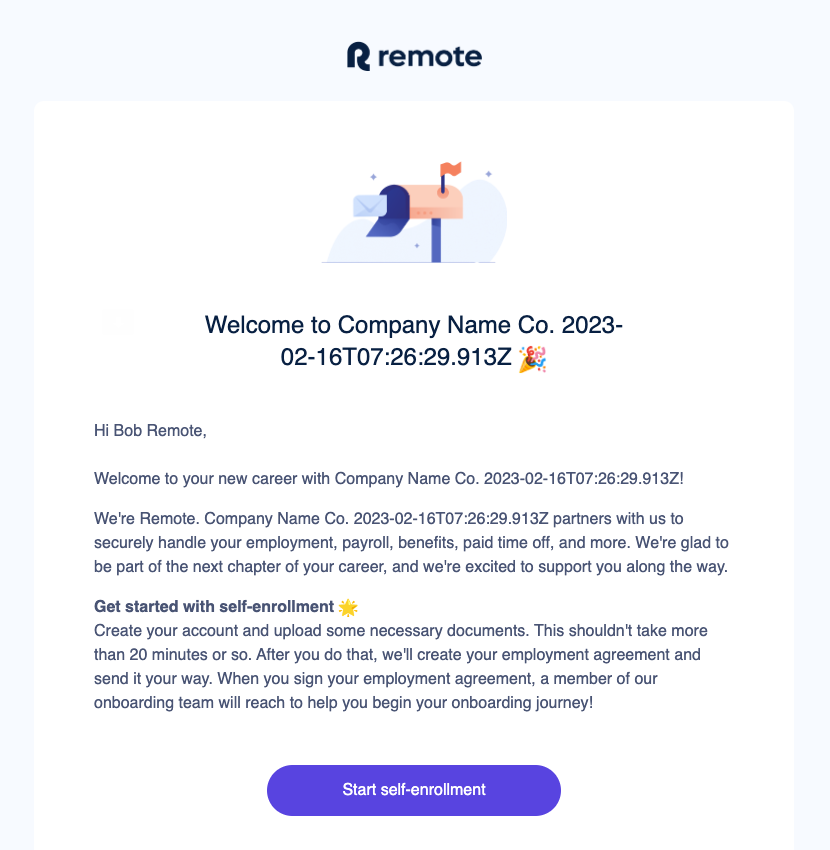
A successful invite will result in a 200 OK response. The employee will then receive an email from [email protected] that looks like the image below. Then they’ll start their own self-enrollment to provide the missing details, such as administrative details, home address, etc.
The email the employee receives may be slightly different than this one, but it should still prompt them to “start self-enrollment”.
When this endpoint is called, some data is invalidated to ensure the employment is still valid. For example, the provisional_start_date is re-validated. If it’s no longer valid, the endpoint will fail and you’ll need to update the invalid data using the Update Employment endpoint.
After the invitation, if you need to check again if an employee was already invited, you can look at their employment: If it has employment_lifecycle_stage: "employee_self_enrollment", it means the employee has received an email to join the Remote platform at their email.
{
	"data": {
    "employment": {
      ...,
      "employment_lifecycle_stage": "employee_self_enrollment",
      ...,
      "id": "9fb23136-bb7c-488a-b5dc-37d3b7c9033b",
      ...
      "status": "invited",
    }
	}
}
<aside>
ℹ️ After an invite is sent to an employee, you will not be able to update employment data through the Remote API. After onboarding, only a limited set of employment data will be available for updates, such as emergency_contact_details.
If you want to provide additional information for employment, please make sure to do so before the employee is invited. We block updates to the employment data because employees need to agree to amendments in certain cases, such as when there are changes to their contract_details. Currently, these amendments can only be done through the Remote Platform.
</aside>
It’s possible to change all the information sent during the creation step, as well as add more information to the employment, beyond just the contract and pricing plan details. For example, you can also provide details for home address, bank accounts, emergency contacts, and much more. You can check all possible parameters and details (as they may vary depending on the country of employment) from the Update Employment endpoint documentation.
For example, you can update the emergency contact details for this employment as well:
$ curl --location \\
     --request PATCH '<https://gateway.remote-sandbox.com/v1/employments/9fb23136-bb7c-488a-b5dc-37d3b7c9033b>' \\
     --header 'Authorization: Bearer eyJraWQiO...' \\
     --header 'Content-Type: application/json' \\
     --data-raw '{
		"emergency_contact_details": {
			"email": "[email protected]",
			"name": "Taylor Johnson",
			"phone_number": "+3519194512312",
			"relationship": "Best friend"
		}
}'
Congratulations, you sent the first self-onboarding invitation! You can continue creating and inviting new hires, and also perform other operations such as syncing time off and entering approved expenses. If you have questions regarding the automatic invitation flow, please reach out to the Remote API team at [email protected].